Importing images from my camera has been easy (as soon as my camera is plugged into a USB port, a dialog box pops up asking me what I want to do); previewing, rotating, and moving images is extremely easy to do via gThumb; and advanced image editing can be done via GIMP (which is similar in complexity to Photoshop). However, one thing that hasn't been easy is figuring out how to resize lots of images at once.
When resizing images for the web I usually create a thumbnail (~200 pixels high or wide) and a larger image (~600 pixels high or wide). To make file management easier I typically append the image's size to the file name. So, for instance, picture.jpg would become picture_200.jpg (a 200-pixel wide or high thumbnail) and picture_600.jpg (a 600-pixel wide or high image). This can be relatively tedious to do in most programs, especially with large numbers of images.
GIMP can handle scripts and plugins, but a quick look through their repositories didn't find anything that looked right (note: I probably missed something), and gThumb doesn't have a bulk resizing feature at all. ImageMagick is a (very powerful) command-line based program that can handle many images at once, and many people have written command-line-based scripts that make ImageMagick easier to use (the most versatile of which is bbips). However, all the scripts I initially found needed to be run from the command line, and none of them would rename the files as I desired.
Then I found G-script, a website that distributes scripts designed to integrate directly with GNOME (Ubuntu's graphical interface, equivalent to Windows) or Nautilus (Gnome's file manager, equivalent to Windows Explorer). G-script's multimedia category featured a script (NIS) that would resize images from within Nautilus. I installed it1, but quickly found that it wasn't quite what I was looking for; while it did have a graphical interface, it didn't have enough resizing options (only had maximum dimension lengths of 160, 320, 640, 800, and 1024 pixels), and while it did move the resized files into a new directory, it didn't rename the files.
In Windows I probably would have been out of luck, but since this is Linux and the script was contained in a text file (and licensed under the GNU GPL), I could freely modify it. So, last night I set about learning the basics of modifying a shell script, and eventually created a script that did everything I wanted.
The new script ("Resize_images"; download it here3) is run as a Nautilus script; once it's installed1 all you have to do is select an image (or multiple images) in the file browser, select the script (by right clicking on the images and looking under the scripts menu), and the script does the following things:
- Presents the user with a list of maximum dimensions2 (e.g., 1024, 800, 600, 400 pixels) that images can be resized to. Images will be resized so that their longest dimension is set at this value; the image's other dimension will be scaled appropriately (with a pre-set quality of 80).
- Resize (theoretically) as many jpgs and gifs as can be selected in Nautilus at once.
- Puts all resized images into a subdirectory named "resized_to_xxx" (where xxx is the maximum dimension that was selected).
- Appends the selected maximum dimension to the filename of resized images. So, if images are resized to a maximum dimension of 600 pixels, "caterpillar.jpg" becomes "caterpillar_600.jpg" and "cute_rat_yawn.JPG" becomes "cute_rat_yawn_600.JPG".
- The script does not modify the original images in any way.
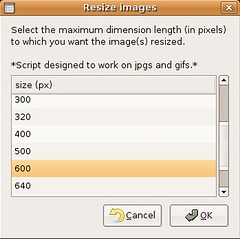
The primary dialog of the Resize_images script.
[Downloaded the script here3.]
The script is run from Nautilus (Ubuntu's basic file browser), so to resize images all I have to do is find them with the file browser, select them, and execute the script (which only requires right-clicking on the image(s) and selecting the script from the "Scripts" menu that appears). That's it. I can now resize dozens of images with just three clicks of the mouse (assuming the images are already selected); I don't have to open Photoshop, GIMP, or any other program.
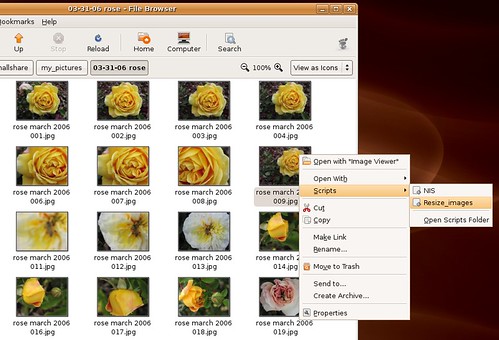
Choosing the Resize_images script from within Nautilus (Ubuntu's file browser) by right-clicking on the image.
This is a great example of the power of open-source (and easily scriptable) operating systems. I had a specific task I wanted to carry out, but even though I couldn't find a pre-written program to perform that task, I found something that did most of what I wanted and then just modified it to make it "perfect." And, since everything is open-source, now I can share my completed script so that others who want to do the same thing can do it more easily, and also so that others can improve upon what I've done (something that's desperately needed, I'm sure).
Notes:
1 To install the script you must first save it to a file, make it executable ("chmod u+x Resize_images"), and then copy it to your Nautilus scripts folder (~/.gnome2/nautilus-scripts). At that point it should be visible in Nautilus when you right click on an item and select "Scripts". The script does require ImageMagick, zenity, and rename to run, but all of these are installable on Ubuntu (and zenity and rename should be installed by default).
2 The list of maximum dimensions can be customized by editing the script file - as many (or as few) options as the user wants can be included, and they can be listed in whatever order the user desires.
3 Keep in mind that I'm a complete novice at scripting, so use at your own risk. I'd suggest testing this on copies of images before trying it on originals. If anyone has improvements to the script, I'd love to see them.
[Updated July 15, 2006 to add screenshots of the script.]
[February 19, 2007 - Updated the script (to v0.75) to support Edgy; many thanks to Dave for finding the required fix. The links in the post now point to v0.75, and a tar.gz of v0.75 can be found here. Version 0.7 can be found here.]


7 comments:
Importing comments:
elbee
I'm running Dapper, too. When running the script, the directory is being created, progress bar is being shown for a very short time,but the newly created directory remains empty. Any idea how to correct?
December 28, 2006, 10:39:22 AM PST – Like – Reply
Radagast
Hi Bohemian,
Yep, the new folder should be created in the same folder as the images. I'm still running Dapper, so haven't been able to test it in Edgy. I can only think of one thing off the top of my head: Have you selected an image size to resize the images to before clicking "ok"? It will exit if no image size is selected.
I'm guessing that you have, and thus I'm not sure what's up. Does it show a progress bar as it resizes each image?
November 20, 2006, 9:39:33 AM PST – Like – Reply
bohemian
Hi,
This script is exactly what I was looking for. But I might be really silly or confused, because I did install it as instructed and when I select an image it brings up the graphical interface to select the image size. But then I press OK and nothing happens (or nothing seems to happen). Where should I look for the new folder? In the same folder that I started? I run Ubuntu Edgy, and I am not sure if I've done something wrong. (All the depends are installed.)
Thanks
November 19, 2006, 1:50:09 AM PST – Like – Reply
David C
Well done!
I've just added this to my Ubuntu 6.06 and it's great.
As you say the great thing about Open Source is that you can modify it, and you've done a good job, not least in then documenting it really well.
Cheers
David
August 23, 2006, 5:07:08 AM PDT – Like – Reply
Nighto
Cool! You saved my life
August 20, 2006, 2:25:26 PM PD
Importing comments:
Radagast
I've just posted a new version of the script (here) that should be usable on Edgy. I only have Dapper here, though, so if users of Edgy could let me know if it works I'd appreciate it.
February 19, 2007, 11:45:38 PM PST – Like – Reply
Radagast
Thanks for hunting that down!
February 19, 2007, 10:35:53 PM PST – Like – Reply
dave
Just thought I would let you know I figured out my problem. Actually I just found the solution provided by someone else. The author of the original script "NIS" has revised it to be compatible with the edgy distro, that was apparently my problem. You can check out his revision here.
http://www.creationgif.com/debian/nis/
Thanks for your work on this,
Dave
February 15, 2007, 7:32:20 PM PST – Like – Reply
Radagast
I'd be happy to work on updating the script, but unfortunately don't know what the problem is. At least one of the commenter's problems was a result of dependency problems, but I don't know what the problem is if the dependencies are there.
Sounds like embedding some debugging code is called for ...
February 13, 2007, 9:43:42 PM PST – Like – Reply
dave
Are you still supporting this script?
I have the same problem as bohemian above. The resize dialog box opens, I select a size for the selected file hit enter and nothing happens. I put the file in the scripts directory and made it executable. The dependencies are present. Do you have an update or any thoughts on what I may be doing wrong. this script appears to be just what I need would sure like to get it to work.
thanks
Dave
February 13, 2007, 8:31:09 PM PST – Like – Reply
Radagast
Elbee - can you try running "convert" from the command line? That's the component of ImageMagick the script uses, and I'd like to see if that runs independently of the script.
I've sent you more details via e-mail.
December 30, 2006, 5:19:37 AM PST
Importing comments:
Josh
This is a wonderful script. Works like a charm. Thanks for your time and effort and eagerness to share.
June 18, 2007, 11:47:45 AM PDT – Like – Reply
Dick Dunbar
OK, I have more info now. I finally realized that the USB drive I tried to use was a Windows drive mounted as read-only. When I tried the same thing on a local writeable linux USB drive, it worked fine. The script should probably have error detection added to catch that, but I can deal with that. I just tried the script on a NAS drive mounted via SMB, and it worked fine on that (I have a lot of oddball things on my network). The only unexplained thing left is why the selected files can't be seen on an NFS mounted volume.
June 13, 2007, 7:53:20 PM PDT – Like – Reply
Radagast
Dick: That's odd. I just tried using the script on my USB drive (here in Feisty), and the script seems to work fine. However, I don't have an NFS mount here, so can't test that.
The script assumes it's working in the current Nautilus directory (i.e., all commands assume they're running in the directory the pictures are in), so it could be that the script (for some reason) isn't executing in the same directory that you're selecting the pictures in. Hmm.
I'm sorry that I can't help more. Let me know if you find a solution!
June 13, 2007, 2:55:00 PM PDT – Like – Reply
Dick Dunbar
Whoops! I kind of found out what the problem was. It works fine if the images selected are on a local disk, like in the home directory. If the files are on a USB drive, it seems to work, but I can't find the directory with the resized images. If the files are on an NFS attached drive, it can't see the selected files. Anybody got a way around that?
June 12, 2007, 2:16:43 PM PDT – Like – Reply
Dick Dunbar
This was exactly what I was looking for, but I can't get it to work. I'm running Edgy, and I installed everything exactly as stated, but somehow it doesn't see my file selections. I bring up the file browser, select a number of files, then right click and select the script, and I get the error display that says no files were selected. Any ideas?
June 12, 2007, 2:03:12 PM PDT
Importing comments (part 1 of a post)
Chris Collins
Great job!
I added this to my Feisty using KDE
I had to make some adjustments to get it to work with Konqueror.
Since Konqueror passes the files to the script with the full path I changed the
convert and rename lines.
replaced
[code]
# set the 'file' variable first
# get extension; everything after last '.'
ext=Great job! I added this to my Feisty using KDE I had to make some adjustments to get it to work with Konqueror. Since Konqueror passes the files to the script with the full path I changed the convert and rename lines. replaced [code] # set the 'file' variable first # get extension; everything after last '.' ext=${file##*.} # basename basename=`basename "$file"` # everything after last '/' basename=${file##*/} # dirname dirname=`dirname "$file"` # everything before last '/' basename=${file%/*} [/code] with [code] # set the 'file' variable first # get extension; everything after last '.' ext=${file##*.} # basename basename=`basename "$file"` # everything after last '/' basename=${file##*/} # dirname dirname=`dirname "$file"` # everything before last '/' basename=${file%/*} [/code]#123;file##*.}
# basename
basename=`basename "$file"`
# everything after last '/'
basename=Great job! I added this to my Feisty using KDE I had to make some adjustments to get it to work with Konqueror. Since Konqueror passes the files to the script with the full path I changed the convert and rename lines. replaced [code] # set the 'file' variable first # get extension; everything after last '.' ext=${file##*.} # basename basename=`basename "$file"` # everything after last '/' basename=${file##*/} # dirname dirname=`dirname "$file"` # everything before last '/' basename=${file%/*} [/code] with [code] # set the 'file' variable first # get extension; everything after last '.' ext=${file##*.} # basename basename=`basename "$file"` # everything after last '/' basename=${file##*/} # dirname dirname=`dirname "$file"` # everything before last '/' basename=${file%/*} [/code]#123;file##*/}
# dirname
dirname=`dirname "$file"`
# everything before last '/'
basename=Great job! I added this to my Feisty using KDE I had to make some adjustments to get it to work with Konqueror. Since Konqueror passes the files to the script with the full path I changed the convert and rename lines. replaced [code] # set the 'file' variable first # get extension; everything after last '.' ext=${file##*.} # basename basename=`basename "$file"` # everything after last '/' basename=${file##*/} # dirname dirname=`dirname "$file"` # everything before last '/' basename=${file%/*} [/code] with [code] # set the 'file' variable first # get extension; everything after last '.' ext=${file##*.} # basename basename=`basename "$file"` # everything after last '/' basename=${file##*/} # dirname dirname=`dirname "$file"` # everything before last '/' basename=${file%/*} [/code]#123;file%/*}
[/code]
with
[code]
# set the 'file' variable first
Importing comments (second half of post): # get extension; everything after last '.'
ext=Great job! I added this to my Feisty using KDE I had to make some adjustments to get it to work with Konqueror. Since Konqueror passes the files to the script with the full path I changed the convert and rename lines. replaced [code] # set the 'file' variable first # get extension; everything after last '.' ext=${file##*.} # basename basename=`basename "$file"` # everything after last '/' basename=${file##*/} # dirname dirname=`dirname "$file"` # everything before last '/' basename=${file%/*} [/code] with [code] # set the 'file' variable first # get extension; everything after last '.' ext=${file##*.} # basename basename=`basename "$file"` # everything after last '/' basename=${file##*/} # dirname dirname=`dirname "$file"` # everything before last '/' basename=${file%/*} [/code]#123;file##*.}
# basename
basename=`basename "$file"`
# everything after last '/'
basename=Great job! I added this to my Feisty using KDE I had to make some adjustments to get it to work with Konqueror. Since Konqueror passes the files to the script with the full path I changed the convert and rename lines. replaced [code] # set the 'file' variable first # get extension; everything after last '.' ext=${file##*.} # basename basename=`basename "$file"` # everything after last '/' basename=${file##*/} # dirname dirname=`dirname "$file"` # everything before last '/' basename=${file%/*} [/code] with [code] # set the 'file' variable first # get extension; everything after last '.' ext=${file##*.} # basename basename=`basename "$file"` # everything after last '/' basename=${file##*/} # dirname dirname=`dirname "$file"` # everything before last '/' basename=${file%/*} [/code]#123;file##*/}
# dirname
dirname=`dirname "$file"`
# everything before last '/'
basename=Great job! I added this to my Feisty using KDE I had to make some adjustments to get it to work with Konqueror. Since Konqueror passes the files to the script with the full path I changed the convert and rename lines. replaced [code] # set the 'file' variable first # get extension; everything after last '.' ext=${file##*.} # basename basename=`basename "$file"` # everything after last '/' basename=${file##*/} # dirname dirname=`dirname "$file"` # everything before last '/' basename=${file%/*} [/code] with [code] # set the 'file' variable first # get extension; everything after last '.' ext=${file##*.} # basename basename=`basename "$file"` # everything after last '/' basename=${file##*/} # dirname dirname=`dirname "$file"` # everything before last '/' basename=${file%/*} [/code]#123;file%/*}
[/code]
September 24, 2007, 12:51:14 PM PDT
Importing comments:
Chris Collins
Chris Collins
Visit me on...
ccollins.us
code did not come through right. sorry
Replaced!
[code]
convert -quality 80 -resize $imgsize "$picture" $imgsizedir/"$picture"
# rename the created file - there's got to be an easier way to handle all cases.
rename s/.JPG$/_$niceimgsize.JPG/ $imgsizedir/"$picture"
rename s/.jpg$/_$niceimgsize.jpg/ $imgsizedir/"$picture"
rename s/.JPEG$/_$niceimgsize.JPEG/ $imgsizedir/"$picture"
rename s/.jpeg$/_$niceimgsize.jpeg/ $imgsizedir/"$picture"
rename s/.GIF$/_$niceimgsize.GIF/ $imgsizedir/"$picture"
rename s/.gif$/_$niceimgsize.gif/ $imgsizedir/"$picture"
rename s/.PNG$/_$niceimgsize.PNG/ $imgsizedir/"$picture"
rename s/.png$/_$niceimgsize.png/ $imgsizedir/"$picture"
[/code]
with
[code]
basename=`basename "$picture"`
# everything after last '/'
basename=code did not come through right. sorry Replaced! [code] convert -quality 80 -resize $imgsize "$picture" $imgsizedir/"$picture" # rename the created file - there's got to be an easier way to handle all cases. rename s/.JPG$/_$niceimgsize.JPG/ $imgsizedir/"$picture" rename s/.jpg$/_$niceimgsize.jpg/ $imgsizedir/"$picture" rename s/.JPEG$/_$niceimgsize.JPEG/ $imgsizedir/"$picture" rename s/.jpeg$/_$niceimgsize.jpeg/ $imgsizedir/"$picture" rename s/.GIF$/_$niceimgsize.GIF/ $imgsizedir/"$picture" rename s/.gif$/_$niceimgsize.gif/ $imgsizedir/"$picture" rename s/.PNG$/_$niceimgsize.PNG/ $imgsizedir/"$picture" rename s/.png$/_$niceimgsize.png/ $imgsizedir/"$picture" [/code] with [code] basename=`basename "$picture"` # everything after last '/' basename=${picture##*/} tempbasename="$imgsize"_"$basename" dirname=`dirname "$picture"` dirname="$dirname/$imgsizedir" convert -quality 80 -resize $imgsize "$picture" $dirname/"$tempbasename" # rename the created file - there's got to be an easier way to handle all cases. mv $dirname/$tempbasename $dirname/$basename [/code]#123;picture##*/}
tempbasename="$imgsize"_"$basename"
dirname=`dirname "$picture"`
dirname="$dirname/$imgsizedir"
convert -quality 80 -resize $imgsize "$picture" $dirname/"$tempbasename"
# rename the created file - there's got to be an easier way to handle all cases.
mv $dirname/$tempbasename $dirname/$basename
[/code]
September 24, 2007, 12:53:51 PM PDT
Importing comments:
Teddi B
thanks so much! this was quick and easy and really helped me out!
teddi b
www.teddi-b-poetic.com
March 26, 2010, 3:25:48 PM PDT – Like – Reply
Josh
Great script.. works perfectly in gutsy! Many thanks!
May 19, 2008, 1:59:45 PM PDT – Like – Reply
John McDougall
I just came across your Resize_images script. What a very useful tool. Thanks. It will make it a lot easier to post pictures on the web.
John
May 16, 2008, 12:21:13 PM PDT – Like – Reply
Dick Dunbar
Just wanted to let you know that I've been using variations on this script for months now, and it's great. I removed the renaming of the files, as I didn't want that. The problem I originally had with NFS files turned out to be a Gnome/Nautilus problem, which is fixed in Ubuntu 8.04 (Hardy). Thanks again for your efforts. This is one of my most heavily used pieces of code, as I maintain a photo gallery website, and am resizing batches of photos all the time.
May 7, 2008, 9:28:20 AM PDT – Like – Reply
Harrie
This works great for me on Edgy. Thank you so much!
November 4, 2007, 2:35:44 PM PST
Post a Comment