My SO and I love making creamy pasta sauces (e.g., sun-dried tomato and sausage cream sauce pasta, garlic and clam cream sauce pasta, and fettucine alfredo), but a few weeks ago we were in the mood for a chicken-based cream sauce, which we didn't have a recipe for. Thus, we decided to experiment a bit, and came up with a sauce that was filled with garlic, sauteed chicken, sun-dried tomatoes, and creamy goodness. We made the sauce again today, adding some spinach and basil, and came up with this dish. While eating we realized that this reminds us of pasta dishes we've had at places like the Olive Garden or Macaroni Grill; the similarity is unintentional. Since we enjoyed this so much, it's this week's end-of-the-week recipe blogging post.
1/2 to 3/4 pounds chicken (we use boneless, skinless chicken thighs)
Salt and ground black pepper
3 tablespoons olive oil
8 garlic cloves, peeled and minced or pressed with a garlic press
8 sun-dried tomato halves, chopped (we use oil-packed tomatoes)
1/4-1/2 teaspoon crushed red pepper
1/2 cup chicken stock
1/4 cup white wine
4 cups loosely packed fresh spinach
2/3 cup heavy cream
1/4 cup loosely packed chopped fresh basil
1/3 cup grated Pecorino Romano cheese, plus extra for serving
1/2 pound dry pasta (we've used fettuccine and penne)
0a. Cook the pasta in salted water until it is al dente. When cooked, drain the pasta, but do not rinse with water. Work on the sauce (steps 1-9) while the pasta is cooking, though schedule your cooking so the pasta is done just a little before it needs to be added to the sauce (in step 10). We usually start the pasta cooking at around the same time we start sauteing the chicken.
0b. Have the garlic, sun-dried tomatoes, red pepper, chicken stock, wine, and spinach ready to add before you start sauteing the chicken, as they need to be added in quick succession once the chicken is finished. Chopping the basil wouldn't be a bad idea either.
1. Trim the excess fat from the chicken and slice it about 1/2"-thick. Sprinkle with a couple pinches of salt and ground black pepper.
2. Heat the olive oil in a large saucepan over medium-high or high heat. Once the oil is hot, add the chicken. Flip the chicken pieces once the bottoms are well browned, and continue sauteing until they're well browned on their other side. Remove the chicken pieces, leaving the oil in the pan. See the notes section for more information on this step.
3. Immediately add the garlic to the pan and cook, stirring constantly, until the garlic starts to brown (usually about a minute or less).
4. Add the sun-dried tomatoes to the pan and stir for another 30 seconds (or until the garlic is starting to get well browned).
5. Add the crushed red pepper and cook, stirring, for a few seconds.
6. Add the chicken stock and wine, and bring the contents of the pan to a simmer. Reduce the heat, adjusting it during the following steps to maintain a simmer.
7. Add the spinach, stirring to mix. Once the spinach has wilted, add the reserved chicken and continue simmering, stirring occasionally, until the liquid is reduced in volume by approximately half (a few minutes).
8. Add the cream and basil, and simmer until the sauce is a good consistency to coat the pasta, stirring frequently; this usually takes 2-4 minutes.
9. Once the sauce is thickened, mix in the cheese.
10. Add the drained pasta, mix well, and serve with additional grated cheese (if desired).
Notes:
Adding whole spinach leaves results in lots of long pieces of wilted spinach in the dish; we enjoy the texture this adds, but if you think you won't, feel free to chop the spinach before cooking it. You could probably substitute dried basil and frozen spinach for their fresh counterparts without issue (making sure to reduce the volumes added to compensate for their dried and/or frozen states). And, as I alluded to in the introduction, we've also made a version of this without spinach and basil; in that version we substituted 1/2 teaspoon ground sage for the basil (adding the sage along with the crushed red pepper), and left the spinach out entirely. We like the spinach and basil version better, but the sage version is good too.
If you have oil-packed sun-dried tomatoes, and want even more sun-dried tomato flavor, try using 3 tablespoons of the oil from the sun-dried tomatoes in place of the olive oil.
Sauteing the chicken properly is key to adding a lot of browned chicken flavor to this dish. To do this, try to stir the chicken as little as possible once it's been added to the pan, and only flip the chicken once it's golden brown on the first side. Once the sauteing is complete there will probably be lots of little fried bits of chicken left in the pan; by using this pan and the oil still in it for the rest of the dish, you're adding all this flavorful goodness to the rest of the dish.
If, while cooking, you suspect that the pasta won't be ready in time, lower the heat during the simmering (steps 7 and 8) to slow the thickening of the sauce.
This recipe is based on the style of cream sauce in our sun-dried tomato and sausage cream sauce pasta and garlic and clam cream sauce pasta recipes, which we obtained from Weinstein and Scarbrough (2002).
Weinstein, B., and M. Scarbrough. 2002. "How to Make a Light Creamy Pasta Sauce." Fine Cooking 50: 45-49.
Sunday, August 19, 2007
Sunday, August 12, 2007
Kidney beans with smoked turkey
Whenever my SO and I go to fairs we love getting smoked turkey legs. The only problem is that we rarely finish them at the fair; since my SO and I ended up with half of a smoked turkey leg left over from a recent trip to a fair, we decided to add it to some kidney beans cooked with onion and spices. We were improvising the entire time, but the dish smelled delicious as it was cooking (Radagast thought a neighbor was barbequeing, until he realized he was smelling this dish), and was thick, creamy, and savory once it was done. It's difficult to describe exactly what this dish is like; it falls somewhere in within the triangle of refried beans, an Indian dal, and bean soup. It's this week's second end-of-the-week recipe blogging post.
2 tablespoons vegetable oil
1/2 medium onion, chopped
3 medium carrots, peeled and cut into rounds
1 red jalapeno (or other fresh chili) pepper, deveined, seeded, and sliced into thin strips about 1-2cm long
4 cloves garlic, finely minced or pressed with a garlic press
1/2 teaspoon cumin
12 peppercorns
6 cloves
2 bay leaves
6 1/2 cups water
3/4 pound dry kidney beans
1/2 of a large smoked turkey leg, bone-in (a chunk of ham should be a fine substitute)
1 teaspoon kosher salt
1. Heat the oil in a pot over medium-high heat. Once the oil is hot, add the onions and carrots and cook, stirring nearly constantly, until the onions turn translucent.
2. Add the jalapeno pepper and continue cooking, stirring nearly constantly, until the onions have turned light brown.
3. Add the garlic and cook a minute or two more.
4. Add the spices and cook for another 30 seconds or so.
5. Add the water, beans, smoked turkey, and salt; stir to mix.
6. Simmer for 2-3 hours, or until the beans are tender and the dish is thickened (it should be the consistency of thin refried beans or a dal; it should not be soupy). Check (and stir) the dish occasionally; add extra water if the dish is drying out. We simmered the dish partially covered for the first hour, and then covered for the remainder of the time. You can mash the cooked beans with a spoon to give the dish a creamier texture, if desired.
7. Once the beans are mostly cooked (during step 6), take out the turkey leg and let it cool. When the turkey leg is cool enough to handle, remove all the meat from the bone (chopping any particularly large pieces) and return the meat to the pot. This can be done anytime after the beans have been cooking for a while.
8. Taste to check the salt level (it may be low for your tastes), adjust to your preference, and then serve.
Notes:
This was another improvised dish, so the proportions are approximate and feel free to play with the ingredients. This tasted great served with Spanish rice, a recipe we'll post once we have the chance to test it out again.
Keep an eye out for the whole spices as you're eating the dish; while they're not harmful to eat, you might want to pick them out if you can find them.
Fresh green bean and tomato salad
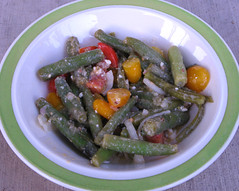
Our garden has been doing well this year, and thus we've had an abundance of tomatoes, green beans, and basil on our hands. Faced with pounds of green beans and tomatoes just asking to be eaten, my SO created this salad. The lime juice and feta cheese contrasted well with the fresh vegetables, and overall this made for a great (and healthy) summer meal. Since we just made this today, it's this week's end-of-the-week recipe blogging post.
Salad:
2 pounds fresh green beans, washed, trimmed, and halved
1 pound tomatoes, chopped into bite-sized pieces
1/2 small onion, ~1/4 to 1/2 cup, quartered and thinly sliced
~1/2 to 3/4 cup crumbled feta cheese
Dressing:
1 shallot, finely minced
1 tablespoon whole-grain mustard
1/2 teaspoon ground black pepper
3/4 teaspoon kosher salt
1/2 cup coarsely chopped fresh basil, loosely packed
juice of 2 large limes
1/2 cup extra virgin olive oil
To make the dressing:
1) Add all the dressing ingredients to a salad shaker (or a bowl) and mix until combined. Let stand a few minutes before using.
To make the salad:
1) Cook the green beans. To do this, bring a large pot of salted water (~1 1/2 tablespoons salt per 12 cups water) to a boil, add the beans, and cook until they're tender (~4-10 minutes; the time will vary depending on the maturity of your beans, so check them periodically).
2) Remove the cooked beans from the boiling water and immerse them in a bowl of cold water. Once they've cooled, transfer them to a strainer to drain off most of the water.
3) Put the cooled green beans, tomatoes, onion, and feta into a large bowl. Add as much of the dressing as you want (we added approximately a cup) and mix gently but thoroughly.
4) Serve immediately.
Notes:
Since this was made without a recipe, all amounts are approximate and flexible; feel free to improvise. And, as with our tomato yogurt salad, this probably requires good fresh vegetables (especially good tomatoes) to be tasty.
As we reported with our honey mustard salad dressing, we make our own whole-grain mustard from scratch (see the recipe here); if you don't have whole-grain mustard available, we'd suggest substituting a grainy mustard.
We ended up with about a half cup of dressing left over; if you don't want extra you may want to scale down the dressing ingredients a bit.
The green bean cooking instructions are from Joy of Cooking.
Reference:
Rombauer, I. S., M. R. Becker, and E. Becker. 1997. Joy of Cooking. Scribner, NY.
[Updated December 2007 to add a link to our homemade mustard recipe.]
Tuesday, August 07, 2007
Ordering glasses online part 2: getting the glasses
About a month ago I reported that my SO and I had ordered some glasses from Optical4Less, an online retailer. As the glasses have now arrived, I wanted to post an update.
Our glasses arrived in the mail about a week and a half after we placed the order. The glasses were wrapped in a cloth and bubble wrap, placed in a hard case, and then shipped in a cardboard box. My glasses (a metal and plastic semi-rimless pair) arrived in perfect condition; all I had to do was adjust the nosepieces (which bent easily with my fingers) and they fit perfectly. I've been wearing them every day since, and haven't had any problems. While I can't verify that the prescription is completely correct, I'm seeing more clearly than I have in years 1.
My SO's glasses arrived in apparently perfect condition, but upon close inspection we discovered that the lenses had several patches of minute scratches that caused blurred vision in a few spots. Our best guess is that the anti-reflective coating had been damaged during the lens shaping/installation, though we don't know exactly what happened.
Optical4Less responded to our e-mail about the problem within a day, and requested pictures of the lenses. Getting a good picture of the scratches proved challenging (as they were small and nearly transparent), but we eventually got a few good pictures and submitted them. Optical4Less got back to us the next business day and told us to mail the glasses back so they could be remade; this cost us about $4. Upon receipt of the glasses, Optical4Less gave us an $8 gift certificate good towards our next purchase.
A few days ago (about two weeks after returning the glasses), we got the replacement pair in the mail, and my SO reports that they're perfect.
Thanks to our success with Optical4Less we've already ordered more pairs (my favorite is a $35 pair of prescription sunglasses from Zenni Optical). So far we've ordered seven pairs of glasses from various retailers, and we've still spent less than it would have cost to buy one pair of glasses at our local optician. We'll never buy from our local store again.
1 It had been more than five years since my last pair of glasses was made (in part due to the price of new ones), so the change was fairly major.
Monday, August 06, 2007
Ubuntu once again beats Windows
Regular readers will likely remember my post comparing the time it took me to install Ubuntu and Windows XP (it was, after all, my most-commented post of all time). I'm happy to report that I now have a new (albeit much shorter) installment for that series.
I recently got a new Toshiba tablet laptop1 which came with Windows XP pre-installed (albeit fiddled with by a few technicians before I got my hands on it). While the tablet works fine in Windows, upon booting it at home I discovered that Windows refused to connect to my wireless network (Intel's wireless program reported that the wireless card was disabled, while Windows hardware manager begged to disagree). After fiddling with it for a bit, I gave up and booted into Ubuntu 7.04 using a LiveCD. Within less than a minute of booting I had a working wireless connection, and I had a completely functioning permanent install in less time than it took me to make a peach pie2. I was even able to use the stylus for navigation as soon as Ubuntu booted.
1 While I initially scoffed at the idea of using a stylus to write on the screen when I was considering what my new computer would be, I'm now in love with my little stylus. Using the stylus to navigate is intuitive, and I already find myself defaulting to the stylus over the built-in mouse.
2 Yes, I actually installed Ubuntu during the spare time I had while making a peach pie. The installation is that easy.
Subscribe to:
Posts (Atom)

