Regular readers will likely remember my post comparing the time it took me to install Ubuntu and Windows XP (it was, after all, my most-commented post of all time). I'm happy to report that I now have a new (albeit much shorter) installment for that series.
I recently got a new Toshiba tablet laptop1 which came with Windows XP pre-installed (albeit fiddled with by a few technicians before I got my hands on it). While the tablet works fine in Windows, upon booting it at home I discovered that Windows refused to connect to my wireless network (Intel's wireless program reported that the wireless card was disabled, while Windows hardware manager begged to disagree). After fiddling with it for a bit, I gave up and booted into Ubuntu 7.04 using a LiveCD. Within less than a minute of booting I had a working wireless connection, and I had a completely functioning permanent install in less time than it took me to make a peach pie2. I was even able to use the stylus for navigation as soon as Ubuntu booted.
1 While I initially scoffed at the idea of using a stylus to write on the screen when I was considering what my new computer would be, I'm now in love with my little stylus. Using the stylus to navigate is intuitive, and I already find myself defaulting to the stylus over the built-in mouse.
2 Yes, I actually installed Ubuntu during the spare time I had while making a peach pie. The installation is that easy.
Showing posts with label ubuntu. Show all posts
Showing posts with label ubuntu. Show all posts
Monday, August 06, 2007


Thursday, June 07, 2007
Installing Ubuntu 7.04 - Feisty Fawn
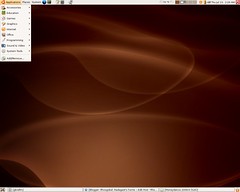
Today I finally got around to installing the latest version of Ubuntu (7.04 - Feisty Fawn). The installation was very easy, especially since my original partition plan included a blank 12 GB partition to hold a new version of Ubuntu. All I had to do was download the 7.04 live CD, boot from it, and then install Ubuntu 7.04 to the blank partition I'd created way back when1.
The look and feel of this version (7.04 - Feisty Fawn) is much the same as the prior version (6.06 - Dapper Drake), so everything I'd learned about 6.06 transferred right over to the newest version. However, there are two major improvements I've already noticed:
- Restricted drivers manger - This little menu item (System -> Administration -> Restricted Drivers Manager) allowed me to install my nVidia video card's driver in less than a minute. In the old version (6.06) I'd had to go and find the package manually, and then fiddle with a few settings. In Feisty Fawn all I had to do was click one button and it was installed.
- Multimedia codec finder - Whenever I click on a media type to play it, Ubuntu now automatically checks to make sure that it has the proper codec installed. If it doesn't have the right codec installed, it searches the repositories, finds the proper package, and asks if I want to download it. I've now been able to play mp3s, quicktime videos, and flash videos all within 30 seconds of clicking on them.
- I installed gaim-guifications, a package that lets Gaim pop up notification windows whenever I have an incoming message (much like Google Talk, Outlook, and other programs do in Windows). After installing the package ("gaim-guifications"), I had to enable it in the "plugins" menu of Gaim.
- I installed my usual assortment of FireFox extensions, including Adblock Plus (which blocks ads), Adblock Filterset.G updater (which automatically updates Adblock's list of ads to block), Flashblock (which automatically blocks all flash applications from starting, preventing many websites from being annoying), Tab Mix Plus (which, among other things, allows you to force all new windows to open in new tabs), and Video Downloader (whose purpose should be fairly intuitive).
- I also configured FireFox so that it would allow smaller tabs, meaning that I won't have to scroll left and right to see all my tabs if I open too many. To do this I went to "about:config" in the browser window and then edited the "browser.tabs.tabMinWidth" value to be 20 (the default was 100; installing the Tab Mix Plus extension meant I had to change the "extensions.tabmix.minWidth" value as well).
- Installed cups-pdf, a package that creates a PDF printer (so I can convert anything I want into a PDF simply by printing it). I followed the instructions here, but essentially all you have to do is install the package "cups-pdf" and then add a new printer (selecting the PDF printer, and then choosing "generic color postscript" as the options). All created PDFs go into the "PDF" directory of your home directory; sym-link this to wherever you want them to go.
- Installed my image resizing script; this required me to install ImageMagick (via the "imagemagick" package), but otherwise was simple.
1 The only problem I've run into so far was that Ubuntu set my maximum resolution to be 1024x768. To fix this I had to manually edit my X configuration file ("gksudo gedit /etc/X11/xorg.conf") and add the option to use a 1280x1024 resolution (by adding that resolution in the "screen" section of the file, next to all the other resolutions listed).
2 In fact, I just reduced the size of my Windows partition so that I'd have more space for files in Ubuntu.
Thursday, April 19, 2007
New Ubuntu release!
The newest version of Ubuntu, Fiesty Fawn (Ubuntu 7.04), was released today. The new version promises to be even easier to use, coming comlete with utilities to facilitiate downloads of media codecs, conversion utilties for Windows users, a restricted drivers manager (making installing proprietary drivers easier), and much more. See these two posts if you want more on the new features.
I've been using Ubuntu daily for the past year, and I love it (see my illustrated tour of Ubuntu for more on what Ubuntu looks like). Since I'm now using a version that's almost a year out of date (Dapper Drake, 6.06), I plan on upgrading to Fiesty as soon as I have some spare time1.
You can order free CDs here, or download the latest version here (and probably eventually get it from here). The CD you order (or download) is a live CD, so you can just pop it in your CD drive, reboot your computer, and give Ubuntu a try without installing anything on your machine.
And, unlike certain other operating systems, this one is completely, 100% free.
1 Yeah, I know, I'm funny. I haven't even had time to post, much less consider upgrading my operating system. Have I mentioned that I can't wait for summer?
Tuesday, November 28, 2006
Creating and posting videos with xvidcap in Ubuntu
One of the reasons I'm excited about teaching online is that there are so many tools I can use to help me share information with students. Animations, videos, audio recordings (e.g., podcasts), blogs, discussion boards, PDFs of readings, textbooks, and plain ol' HTML pages can all be combined to make a course that is (hopefully) more interesting and accessible than just a textbook and HTML pages. So, in the coming months I'm going to be trying out various programs to see which ones I can use while creating content.
For the past few weeks I've been exploring different methods of creating videos. There are two specific things I want to do with videos in my course:
Xvidcap
The predominant free open source video capture solution for Linux seems to be xvidcap. The program is completely free; it can be downloaded from xvidcap's Sourceforge page. They even have a .deb file that installs in seconds on Ubuntu; to install it all you have to do is download the .deb file and then double-click on it in the file browser (Nautilus), which will bring up a dialog that installs the program.
Using xvidcap is fairly straightforward; it has a small control panel and a little red box. Once you hit record on the control panel, xvidcap records everything that occurs in that little red box. The box can be resized to fit whatever you want to record using the eyedropper tool, which allows you to either click and drag to move the box or click into a program window to have the box sized to fit that program's window. The box is attached to the bottom of the control panel by default, but can be undocked from the control panel by hitting the lock button.

Screenshot of xvidcap; the program records everything that occurs in the red box.
The preferences are accessed by right-clicking on the filename (to bring up the main menu) and then clicking "preferences." Xvidcap can either save a series of screencaps to a directory (what xvidcap calls single-frame recording, which lacks audio) or can record a full-motion video with audio (multi-frame recording). The preferences window allows you to set all sorts of preferences - you can choose your output file format, video and audio codecs, video and audio quality, and frame-rate. Choosing wisely here is key, as too high a quality or framerate will result in videos with skipped frames (which will look and sound bad) or files that are unplayable on most computers (e.g., Microsoft Windows doesn't have DIVX codecs installed by default). As a minor note, some codec and framerate combinations are not possible, which unfortunately is often reported to you solely in the form of a program crash (but it's easy to reopen).

Screenshot of xvidcap's multi-frame capture preferences.
My computer is old enough that I needed to lower the video quality and reduce the framerate as low as possible (7.5fps for the Microsoft DIVX 2 or MPEG DIVX codecs) to enable 700x700 video recordings without frame skippage. Reducing the size of the recording window does enable me to make higher-quality recordings, but there's only so small you can resize something before you lose important details.
Once you've got the options set, recording a video is about as easy as hitting the record button. When you're done recording, xvidcap will pop up a little screen summarizing the video that you just captured; pay attention to the framerate - if it's significantly lower than what you were hoping for, you will probably have to re-record the video (lowering the quality or recording area size). Practice recording with various settings to see what works best on your machine.
As a final note, if you're recording directly to flash video you may want to make note of the movie dimensions, as you may need that information to properly embed the video in a webpage.
Microphones and audio
Xvidcap will record audio along with your video; all you need is a working microphone and xvidcap takes care of the rest. This allows for easy narration of videos, something I plan to do regularly.
I'm using a Sennheiser PC 150 stereo headset with noise canceling microphone; it's probably not the best microphone out there, but it seems to work well. Setting up the microphone in Ubuntu was easy, if non-intuitive. I had to open the volume control (by right-clicking on the speaker in the task bar), go to the preferences in that control (edit/preferences), put a checkmark by all the microphone options ("microphone", "Mic boost", and "mic select"), unmute the microphone on the capture tab, and then turn on the "Mic boost +20db" option in the switches tab. As I said: easy, but not intuitive.
Choosing video codecs and creating Flash video files
Xvidcap has a number of codec options, and I'm still trying to figure out which codecs work best; here's what I've found so far (with very limited testing only only a couple of computers):
Converting from the DIVX MPEG4 codec to flash files was relatively easy using mencoder (a component of mplayer). The command line to convert the files I eventually settled on (thanks to the mplayer manual) was:
Flash movie files have timing information in them that helps flash players play them; mencoder apparently does not include this information. However, the program flvtool2 can add this information (I found this thanks to DRM's excellent post). There is no flvtool2 package for Ubuntu, but downloading and installing it was relatively easy1. Once you've got flvtool2 installed, all you need to do to add the timing information is:
Putting a flash video on the web
To actually play a flv file in a webpage you need a flash file on the webpage that will play the movie. While Adobe Flash can create these for you (for the low low price of $699 for Flash Pro 8), the entire point of this exercise has been to create videos using free open source tools. That's where FlowPlayer comes in.
FlowPlayer is a free open-source flash video player that can be easily added to a website; all you have to do is upload a few files to the server (as a user; no need to be root or actually install anything), insert FlowPlayer's quickstart HTML code into the HTML page of your choice, and you've got flash videos embedded into your webpage.
Samples
For a sample of how this looks, I've created three short videos and posted them here. Sorry, but you won't be hearing my voice in any of those videos, you'll just hear some music recorded by putting my microphone in front of a speaker (translation: badly recorded music)2.
And, here's an example of one of those sample videos embedded into this page:
Exciting, isn't it?
Conclusion
It seems like xvidcap will be able to produce satisfactory video tutorials that focus on how to use programs and websites, and the videos produced will be easy to distribute in a variety of formats, including flash videos on the web. However, I have no idea if xvidcap will be able to easily create videos of slide-based presentations (using OpenOffice Impress); figuring out how to create videos of slide-based content will have to be the subject of another post.
1: To install flvtool2 just unzip into a directory and follow the instructions in the readme.txt (which basically say to run "ruby setup.rb config", "ruby setup.rb setup", and "sudo ruby setup.rb install"). You may have to install ruby first; Ruby can be installed via Ubuntu's standard interface.
2: I can't very well be a pseudonymous blogger and have my voice plastered all over the internets, now can I?
For the past few weeks I've been exploring different methods of creating videos. There are two specific things I want to do with videos in my course:
- Create videos of tasks being performed on the desktop (screencap videos), primarily to create tutorials to help students use Excel, browse my course website, and other such things.
- Create animated mini-lectures on key topics, probably based on PowerPoint (or OpenOffice Impress) slides. These will ideally be less than 5 minutes each and contain a combination of text, images, and animations.
Xvidcap
The predominant free open source video capture solution for Linux seems to be xvidcap. The program is completely free; it can be downloaded from xvidcap's Sourceforge page. They even have a .deb file that installs in seconds on Ubuntu; to install it all you have to do is download the .deb file and then double-click on it in the file browser (Nautilus), which will bring up a dialog that installs the program.
Using xvidcap is fairly straightforward; it has a small control panel and a little red box. Once you hit record on the control panel, xvidcap records everything that occurs in that little red box. The box can be resized to fit whatever you want to record using the eyedropper tool, which allows you to either click and drag to move the box or click into a program window to have the box sized to fit that program's window. The box is attached to the bottom of the control panel by default, but can be undocked from the control panel by hitting the lock button.
Screenshot of xvidcap; the program records everything that occurs in the red box.
The preferences are accessed by right-clicking on the filename (to bring up the main menu) and then clicking "preferences." Xvidcap can either save a series of screencaps to a directory (what xvidcap calls single-frame recording, which lacks audio) or can record a full-motion video with audio (multi-frame recording). The preferences window allows you to set all sorts of preferences - you can choose your output file format, video and audio codecs, video and audio quality, and frame-rate. Choosing wisely here is key, as too high a quality or framerate will result in videos with skipped frames (which will look and sound bad) or files that are unplayable on most computers (e.g., Microsoft Windows doesn't have DIVX codecs installed by default). As a minor note, some codec and framerate combinations are not possible, which unfortunately is often reported to you solely in the form of a program crash (but it's easy to reopen).
Screenshot of xvidcap's multi-frame capture preferences.
My computer is old enough that I needed to lower the video quality and reduce the framerate as low as possible (7.5fps for the Microsoft DIVX 2 or MPEG DIVX codecs) to enable 700x700 video recordings without frame skippage. Reducing the size of the recording window does enable me to make higher-quality recordings, but there's only so small you can resize something before you lose important details.
Once you've got the options set, recording a video is about as easy as hitting the record button. When you're done recording, xvidcap will pop up a little screen summarizing the video that you just captured; pay attention to the framerate - if it's significantly lower than what you were hoping for, you will probably have to re-record the video (lowering the quality or recording area size). Practice recording with various settings to see what works best on your machine.
As a final note, if you're recording directly to flash video you may want to make note of the movie dimensions, as you may need that information to properly embed the video in a webpage.
Microphones and audio
Xvidcap will record audio along with your video; all you need is a working microphone and xvidcap takes care of the rest. This allows for easy narration of videos, something I plan to do regularly.
I'm using a Sennheiser PC 150 stereo headset with noise canceling microphone; it's probably not the best microphone out there, but it seems to work well. Setting up the microphone in Ubuntu was easy, if non-intuitive. I had to open the volume control (by right-clicking on the speaker in the task bar), go to the preferences in that control (edit/preferences), put a checkmark by all the microphone options ("microphone", "Mic boost", and "mic select"), unmute the microphone on the capture tab, and then turn on the "Mic boost +20db" option in the switches tab. As I said: easy, but not intuitive.
Choosing video codecs and creating Flash video files
Xvidcap has a number of codec options, and I'm still trying to figure out which codecs work best; here's what I've found so far (with very limited testing only only a couple of computers):
- The MPEG 4 DIVX and general AVI file (DIVX, mpeg) work well for me on Linux, but don't seem to play well on Windows or Mac computers by default (they need DIVX codecs)
- The Microsoft DIVX 2 and Microsfot avi file format seems to works well on Linux, Windows, and Macs.
- The mp2 audio codec seems to work well on Linux and Windows, but not Mac. Unfortunately, I can't seem to get the mp3 codec to work with the Microsoft DIVX 2 codec.
- Flash videos (.flv, what YouTube uses) work very well cross platform, but require a flash player to play.
- Create the flash files directly from xvidcap
- Create the movies using another codec and then convert them to flash files
Converting from the DIVX MPEG4 codec to flash files was relatively easy using mencoder (a component of mplayer). The command line to convert the files I eventually settled on (thanks to the mplayer manual) was:
mencoder inputfile.mpeg -o outputfile.flv -of lavf -oac mp3lame -lameopts abr:br=56 -ovc lavc -lavcopts vcodec=flv:vbitrate=500:mbd=2:mv0:trell:v4mv:cbp:last_pred=3 -srate 22050 -lavfopts i_certify_that_my_video_stream_does_not_use_b_framesThis conversion step also allows you to scale the size of the video to whatever you want; simply add the flag -vf scale=YYY:-2 to the command line and the movie will be scaled to YYY pixels wide (proportionally scaling the vertical dimension).
Flash movie files have timing information in them that helps flash players play them; mencoder apparently does not include this information. However, the program flvtool2 can add this information (I found this thanks to DRM's excellent post). There is no flvtool2 package for Ubuntu, but downloading and installing it was relatively easy1. Once you've got flvtool2 installed, all you need to do to add the timing information is:
flvtool2 -U inputfile.flvFlvtool2 can also be used to do a number of other things, including adding timestamps to the video for thumbnails (so users can skip through the video to specific timepoints).
Putting a flash video on the web
To actually play a flv file in a webpage you need a flash file on the webpage that will play the movie. While Adobe Flash can create these for you (for the low low price of $699 for Flash Pro 8), the entire point of this exercise has been to create videos using free open source tools. That's where FlowPlayer comes in.
FlowPlayer is a free open-source flash video player that can be easily added to a website; all you have to do is upload a few files to the server (as a user; no need to be root or actually install anything), insert FlowPlayer's quickstart HTML code into the HTML page of your choice, and you've got flash videos embedded into your webpage.
Samples
For a sample of how this looks, I've created three short videos and posted them here. Sorry, but you won't be hearing my voice in any of those videos, you'll just hear some music recorded by putting my microphone in front of a speaker (translation: badly recorded music)2.
And, here's an example of one of those sample videos embedded into this page:
Adblock
Exciting, isn't it?
Conclusion
It seems like xvidcap will be able to produce satisfactory video tutorials that focus on how to use programs and websites, and the videos produced will be easy to distribute in a variety of formats, including flash videos on the web. However, I have no idea if xvidcap will be able to easily create videos of slide-based presentations (using OpenOffice Impress); figuring out how to create videos of slide-based content will have to be the subject of another post.
1: To install flvtool2 just unzip into a directory and follow the instructions in the readme.txt (which basically say to run "ruby setup.rb config", "ruby setup.rb setup", and "sudo ruby setup.rb install"). You may have to install ruby first; Ruby can be installed via Ubuntu's standard interface.
2: I can't very well be a pseudonymous blogger and have my voice plastered all over the internets, now can I?
Friday, July 07, 2006
Bulk resizing and renaming images in Ubuntu - The Resize_images Nautilus script
I take a lot of pictures, and thus image manipulation is one of the more frequent tasks I do on a computer (though I'm by no means a pro). Since I'm in the process of switching to using Ubuntu, in the past few days I've been learning how Ubuntu handles images.
Importing images from my camera has been easy (as soon as my camera is plugged into a USB port, a dialog box pops up asking me what I want to do); previewing, rotating, and moving images is extremely easy to do via gThumb; and advanced image editing can be done via GIMP (which is similar in complexity to Photoshop). However, one thing that hasn't been easy is figuring out how to resize lots of images at once.
When resizing images for the web I usually create a thumbnail (~200 pixels high or wide) and a larger image (~600 pixels high or wide). To make file management easier I typically append the image's size to the file name. So, for instance, picture.jpg would become picture_200.jpg (a 200-pixel wide or high thumbnail) and picture_600.jpg (a 600-pixel wide or high image). This can be relatively tedious to do in most programs, especially with large numbers of images.
GIMP can handle scripts and plugins, but a quick look through their repositories didn't find anything that looked right (note: I probably missed something), and gThumb doesn't have a bulk resizing feature at all. ImageMagick is a (very powerful) command-line based program that can handle many images at once, and many people have written command-line-based scripts that make ImageMagick easier to use (the most versatile of which is bbips). However, all the scripts I initially found needed to be run from the command line, and none of them would rename the files as I desired.
Then I found G-script, a website that distributes scripts designed to integrate directly with GNOME (Ubuntu's graphical interface, equivalent to Windows) or Nautilus (Gnome's file manager, equivalent to Windows Explorer). G-script's multimedia category featured a script (NIS) that would resize images from within Nautilus. I installed it1, but quickly found that it wasn't quite what I was looking for; while it did have a graphical interface, it didn't have enough resizing options (only had maximum dimension lengths of 160, 320, 640, 800, and 1024 pixels), and while it did move the resized files into a new directory, it didn't rename the files.
In Windows I probably would have been out of luck, but since this is Linux and the script was contained in a text file (and licensed under the GNU GPL), I could freely modify it. So, last night I set about learning the basics of modifying a shell script, and eventually created a script that did everything I wanted.
The new script ("Resize_images"; download it here3) is run as a Nautilus script; once it's installed1 all you have to do is select an image (or multiple images) in the file browser, select the script (by right clicking on the images and looking under the scripts menu), and the script does the following things:
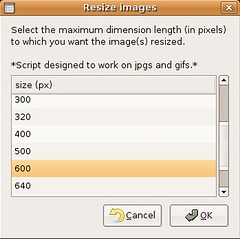
The primary dialog of the Resize_images script.
[Downloaded the script here3.]
The script is run from Nautilus (Ubuntu's basic file browser), so to resize images all I have to do is find them with the file browser, select them, and execute the script (which only requires right-clicking on the image(s) and selecting the script from the "Scripts" menu that appears). That's it. I can now resize dozens of images with just three clicks of the mouse (assuming the images are already selected); I don't have to open Photoshop, GIMP, or any other program.
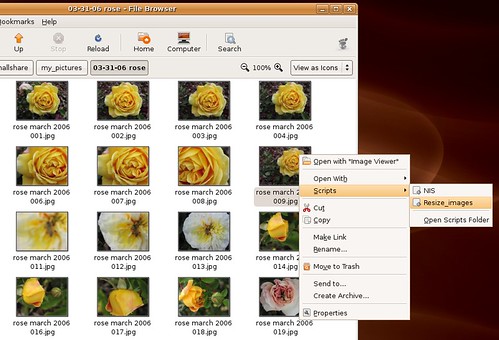
Choosing the Resize_images script from within Nautilus (Ubuntu's file browser) by right-clicking on the image.
This is a great example of the power of open-source (and easily scriptable) operating systems. I had a specific task I wanted to carry out, but even though I couldn't find a pre-written program to perform that task, I found something that did most of what I wanted and then just modified it to make it "perfect." And, since everything is open-source, now I can share my completed script so that others who want to do the same thing can do it more easily, and also so that others can improve upon what I've done (something that's desperately needed, I'm sure).
Notes:
1 To install the script you must first save it to a file, make it executable ("chmod u+x Resize_images"), and then copy it to your Nautilus scripts folder (~/.gnome2/nautilus-scripts). At that point it should be visible in Nautilus when you right click on an item and select "Scripts". The script does require ImageMagick, zenity, and rename to run, but all of these are installable on Ubuntu (and zenity and rename should be installed by default).
2 The list of maximum dimensions can be customized by editing the script file - as many (or as few) options as the user wants can be included, and they can be listed in whatever order the user desires.
3 Keep in mind that I'm a complete novice at scripting, so use at your own risk. I'd suggest testing this on copies of images before trying it on originals. If anyone has improvements to the script, I'd love to see them.
[Updated July 15, 2006 to add screenshots of the script.]
[February 19, 2007 - Updated the script (to v0.75) to support Edgy; many thanks to Dave for finding the required fix. The links in the post now point to v0.75, and a tar.gz of v0.75 can be found here. Version 0.7 can be found here.]
Importing images from my camera has been easy (as soon as my camera is plugged into a USB port, a dialog box pops up asking me what I want to do); previewing, rotating, and moving images is extremely easy to do via gThumb; and advanced image editing can be done via GIMP (which is similar in complexity to Photoshop). However, one thing that hasn't been easy is figuring out how to resize lots of images at once.
When resizing images for the web I usually create a thumbnail (~200 pixels high or wide) and a larger image (~600 pixels high or wide). To make file management easier I typically append the image's size to the file name. So, for instance, picture.jpg would become picture_200.jpg (a 200-pixel wide or high thumbnail) and picture_600.jpg (a 600-pixel wide or high image). This can be relatively tedious to do in most programs, especially with large numbers of images.
GIMP can handle scripts and plugins, but a quick look through their repositories didn't find anything that looked right (note: I probably missed something), and gThumb doesn't have a bulk resizing feature at all. ImageMagick is a (very powerful) command-line based program that can handle many images at once, and many people have written command-line-based scripts that make ImageMagick easier to use (the most versatile of which is bbips). However, all the scripts I initially found needed to be run from the command line, and none of them would rename the files as I desired.
Then I found G-script, a website that distributes scripts designed to integrate directly with GNOME (Ubuntu's graphical interface, equivalent to Windows) or Nautilus (Gnome's file manager, equivalent to Windows Explorer). G-script's multimedia category featured a script (NIS) that would resize images from within Nautilus. I installed it1, but quickly found that it wasn't quite what I was looking for; while it did have a graphical interface, it didn't have enough resizing options (only had maximum dimension lengths of 160, 320, 640, 800, and 1024 pixels), and while it did move the resized files into a new directory, it didn't rename the files.
In Windows I probably would have been out of luck, but since this is Linux and the script was contained in a text file (and licensed under the GNU GPL), I could freely modify it. So, last night I set about learning the basics of modifying a shell script, and eventually created a script that did everything I wanted.
The new script ("Resize_images"; download it here3) is run as a Nautilus script; once it's installed1 all you have to do is select an image (or multiple images) in the file browser, select the script (by right clicking on the images and looking under the scripts menu), and the script does the following things:
- Presents the user with a list of maximum dimensions2 (e.g., 1024, 800, 600, 400 pixels) that images can be resized to. Images will be resized so that their longest dimension is set at this value; the image's other dimension will be scaled appropriately (with a pre-set quality of 80).
- Resize (theoretically) as many jpgs and gifs as can be selected in Nautilus at once.
- Puts all resized images into a subdirectory named "resized_to_xxx" (where xxx is the maximum dimension that was selected).
- Appends the selected maximum dimension to the filename of resized images. So, if images are resized to a maximum dimension of 600 pixels, "caterpillar.jpg" becomes "caterpillar_600.jpg" and "cute_rat_yawn.JPG" becomes "cute_rat_yawn_600.JPG".
- The script does not modify the original images in any way.
The primary dialog of the Resize_images script.
[Downloaded the script here3.]
The script is run from Nautilus (Ubuntu's basic file browser), so to resize images all I have to do is find them with the file browser, select them, and execute the script (which only requires right-clicking on the image(s) and selecting the script from the "Scripts" menu that appears). That's it. I can now resize dozens of images with just three clicks of the mouse (assuming the images are already selected); I don't have to open Photoshop, GIMP, or any other program.
Choosing the Resize_images script from within Nautilus (Ubuntu's file browser) by right-clicking on the image.
This is a great example of the power of open-source (and easily scriptable) operating systems. I had a specific task I wanted to carry out, but even though I couldn't find a pre-written program to perform that task, I found something that did most of what I wanted and then just modified it to make it "perfect." And, since everything is open-source, now I can share my completed script so that others who want to do the same thing can do it more easily, and also so that others can improve upon what I've done (something that's desperately needed, I'm sure).
Notes:
1 To install the script you must first save it to a file, make it executable ("chmod u+x Resize_images"), and then copy it to your Nautilus scripts folder (~/.gnome2/nautilus-scripts). At that point it should be visible in Nautilus when you right click on an item and select "Scripts". The script does require ImageMagick, zenity, and rename to run, but all of these are installable on Ubuntu (and zenity and rename should be installed by default).
2 The list of maximum dimensions can be customized by editing the script file - as many (or as few) options as the user wants can be included, and they can be listed in whatever order the user desires.
3 Keep in mind that I'm a complete novice at scripting, so use at your own risk. I'd suggest testing this on copies of images before trying it on originals. If anyone has improvements to the script, I'd love to see them.
[Updated July 15, 2006 to add screenshots of the script.]
[February 19, 2007 - Updated the script (to v0.75) to support Edgy; many thanks to Dave for finding the required fix. The links in the post now point to v0.75, and a tar.gz of v0.75 can be found here. Version 0.7 can be found here.]
Subscribe to:
Posts (Atom)

 Posts
Posts

