Key lime pie is surprisingly easy to make from scratch. Making the crust is as simple as grinding up some graham crackers (or buying graham cracker crumbs), mixing them with butter and sugar, and then pressing the mixture into a pan. The filling is only slightly more difficult: zest and squeeze a few limes, add some sweetened condensed milk and egg yolks, and you're ready to pour it into the crust and bake. Then all you have to do is chill the pie and top with whipped cream. That's it. Really.
Since Key lime pie is one of our favorite pies, and we baked one this past week, it's this week's second end-of-the-week recipe blogging post.
Crumb crust:
1 1/2 cups graham cracker crumbs
6 tablespoons melted butter
1/4 cup sugar
Pie filling:
1 can (15 ounces) sweetened condensed milk
4 large egg yolks
1/2 cup fresh lime juice
3-4 teaspoons grated lime zest
Assembly:
Sweetened whipped cream - canned (e.g., Reddi-wip) or homemade (3/4 cup heavy cream and 1/4 cup powdered sugar)
For this recipe you first make the pie crust, then make the filling while the crust is baking. After the crust has baked, pour the filling into the still-hot crust, and then bake.
Making the crust:
0) Preheat the oven to 350F.
1) To make the graham cracker crumbs, we break graham crackers into quarters and process them in our food processor until they are a coarse powder. If you don't have a food processor, you can put graham crackers into a large plastic bag (e.g., large Ziploc bags) and crush the graham crackers with a rolling pin, or just buy premade graham cracker crumbs.
2) Mix the graham cracker crumbs, butter, and sugar in a medium bowl with a fork (or in the food processor) until combined.
3) Spread evenly into a 9-inch pie pan (~9-inch diameter at the top, ~7-inch diameter at the bottom) to cover the bottom and sides. Press firmly with the back of a spoon (or your fingers) until the crust sticks together; I use my thumb and forefinger to compress the crust at the very top of the pan. It is very easy to accidentally have more crust in the corner where the sides meet the bottom than elsewhere in the pan, so try to scoop out extra material from there (this is a purely aesthetic problem, so don't panic if your crust is thicker there). I often end up with some extra crust mix left over; it's tasty to snack on.
4) Bake the pie crust until it is lightly brown, approximately 10 to 15 minutes.
Making the pie:
0) When the pie crust is baked, reduce the oven's temperature to 325F.
1) Mix the sweetened condensed milk, egg yolks, lime juice, and lime zest in a bowl.
2) Pour the mixture into the pie crust and bake at 325F for 15 to 17 minutes, or until the "center looks set but still quivery, like gelatin, when the pan is nudged".
3) Let the pie cool to room temperature.
4) Refrigerate the pie, covered, until cold (we leave it overnight).
Serving the pie:
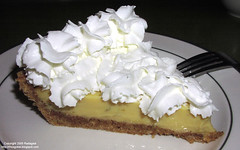
1) Cover the pie with whipped cream, and cut into slices. We use canned whipped cream (e.g. Reddi-wip) if we're feeling lazy, or make our own by whipping 3/4 cup cold heavy cream with 1/4 cup powdered sugar until the cream forms stiff peaks. If we're just baking a pie for the two of us, and thus don't plan to finish the pie in one sitting, we don't cover the whole pie with whipped cream, instead only applying whipped cream to each slice.
To get 1/2 cup lime juice you will likely need about 3-4 regular limes or possibly 15 or more Key limes (which are smaller); the pie is tasty with either variety of lime. That number of limes should be more than enough to provide the lime zest. To zest citrus we use a fine Microplane grater. If you run out of limes (or want a tasty variation), you can substitute lemon juice for some of the lime juice; we've made the pie with a 50:50 mixture, and it tasted great.
We'll frequently bring this pie to potlucks; we bake the pie the night before, leave it in the fridge overnight, and then bring along a can of Reddi-wip so people can add whipped cream themselves.
And for goodness's sake, please don't use Cool-whip or green food coloring.
This recipe is from:
Rombauer, I. S., M. R. Becker, and E. Becker. 1997. Joy of Cooking. Scribner, NY.
Recipe


No comments:
Post a Comment